5/13/12 After looking at dozens of boats, and hundreds of photos online, we finally drew up what we wanted in a canvas enclosure.

Then we talked to several different vendors to get their advice and comment on our plans and to gauge how well we thought we could work with them.

After all that we settled on Dan Wood of Canvas Creations. He did a great job. The first night we had the enclosure, we cooked ribs on the grill and sat inside the warm enclosure on a cold, rainy evening. It was fantastic!
4/30/12 Just a simple idea. Maybe a couple hours at most. Just move the speed/depth instrument from the left side of the cockpit around to the front. Over on the left side, someone is always sitting in front of it. Not good. So we wanted to move it to the front just above the companionway. Step 1: pull the speaker (easy) to get to the back of the gauge.

Well – that’s the end of the easy steps. Crud!
To get to the new location, the center section of the companionway had to come out. To get that out, much of the overhead in the cabin had to come down. It’s amazing how many little pieces of wood go into the headliner of a sailboat! There are trim pieces, headliner sections and backing pieces under all that. Just to get to the 12 little bolts we needed to access.

Once we got to it, drilling the new hole and installing the gauge at the new location was easy.

Now just bolt it all back together and voila!
Not so fast, naive one! Seems like that center section of coaming was press fit way back when the boat was built. Either that or it was made from some special type of fiberglass that expands when air gets under it. Whatever happened, it would not go back into place. No amount of pushing pulling, stomping, or pleading would make it fit.
Of course, that’s when we ran short of time and had to leave for a couple hours for a 1 year old birthday party, leaving Phil alone with a dremel tool, a saber saw and a too-big piece of fiberglass. Who knew what we would find when we returned.
Nothing to fear! When we got back, the coaming section was about a 1/4″ narrower and it fit perfectly! A little filing, a little butyl tape and it was time to snug it all up.

Next time I suggest an easy, 2 hour project, someone please knock some sense into me!
4/16/12 Back on the water! After worship on Sunday, we headed out for our inaugural voyage of 2012.


We were able to get all the projects done that needed to be done before we could go sailing just in time to get out on the water for Greg’s birthday. Jenny, Damien, Becca and Eliana come with us. Phil and Kathy, no excuses will be accepted next time!
4/16/12 The final push to get ready for the season. Seems like no matter how many projects get done during the winter, it’s always a rush at the last minute. But first a very necessary diversion…
 |
| Sock burning party at the marina |
The door of the propane locker has long ago given up it’s wooden core and turned into a spongy trap on the starboard deck. So off it came and out came the dremel tool. Cutting away the inside skin allowed access to vacuum out the old rotten core. New core in a thickened epoxy bed, followed by a couple layer of fiberglass cloth.
 |
| Rebuilding the door for the fuel locker |
Now to reinstall and test.
 |
| Installing the new door |
Aahh. Much better. And the new core is isolated from the now through-bolted hinges so there shouldn’t be any future core issues.
 |
| Now it’s safe to walk on |
Who goes sailing without tunes? But the ipod playlist needs a decent stereo and speakers to be heard. It’s amazing how easy it gets to disassemble all the interior cabinetry after the umpteenth time.
 |
| Installing a new stereo |
We’re having a new canvas enclosure built. They started while up in the yard. And continued in the water. Should be great when it’s finished!
 |
| Meeting neighbors at the marina |
Now on to one of those ugly projects that’s not hard, just a pain. Rebedding all the lifeline stanchions. The old ones were gasketed and the gaskets had hardened and flexed way too much. Off with the stanchions, in went the thickened epoxy to reinforce the holes, then back went the stanchions with a solid bed of butyl tape. Much stiffer and dryer!
 |
| Removed all stanchions to re-bed them |
While working on the stanchions, we found out that the headliner in the aft cabin was great at soaking up all the winter condensation. So off it came to be dried, re-glued and re-attached. That project wasn’t even on the list!
 |
| Headliner from the aft cabin being repaired and reinstalled |
Then the fun stuff. Get the sails back on and turn Paperbird back into a sailboat.
 |
| Jib coming out of winter storage |
A quick washdown and we’re ready to go…
 |
| Swabbing the deck |
4/12/12 Almost exactly a year after we purchased Paperbird, she’s in the water with her new name, new electrical system, chainplates, and so on.

It’s been a long winter filled with lots of projects, time spent dreaming of future voyages..

…lots of coffee…
 |
| Come on down for a cup of coffee! |
… and great times talking with our friends Phil and Kathy, whose help, advice and fellowship has truly been fantastic all winter. They have proven me a liar. I always maintained that boatowners have no friends in the spring, only in the summer. In the spring is all the work getting the boat ready for all the fun in the summer. But Phil and Kathy have not only been steadfast in the spring, but all through the winter, helping with the dirtiest, crummiest chores and projects. We are forever grateful and in their debt and are looking forward now to enjoying with them the summertime fruits of those labors.
Thank you!
3/24/12 Now that the hull refinishing is complete (except for the wax), part 2 of the renaming can proceed. Part 1 was getting the old name – Phoenix – and hailing port, off.
We started with the hailing port as practice.

Then it was on to the main event, the new name decals on each side.

On goes the decal…

Off comes the backing paper!!

And, of course, the new name has to be christened,

and then toasted.

Paperbird was the name of our first boat many boats ago. She was named after a Roger Whittaker song that I used to listen to when soaring. Soaring, however, is not much of a family activity. So we decided to take up sailing instead. Lyn chose the name Paperbird to mark the transition. We thought it would be fitting to come full circle. And so Paperbird will sail again!
3/18/12 One of the not so fun projects on the list was to refinish the hull. It had suffered several years of neglect and the oxidation was pretty bad.
 |
| very professional scaffolding… |
For better or worse, we found a “recommended” series of steps to restore the gelcoat. Better because it works. Worse because of the steps involved in getting there. It starts with wetsanding the whole boat with 1000 grit sandpaper. Then rubbing compound and a 20 lb polisher. Followed by another pass with polish.
 |
| 3 generations at work! |
After the polishing is done, it’s time for the waxing. Wax on – wax off. Our shoulders never hurt so much! We even got our grandson Noah in on the action.
 |
| How’s this look? |
Noah was great. And he had to have his rag in his pocket!
 |
| The rag is a must have |
 |
| Just 1 foot at a time. |
After the sanding, compounding, polishing and waxing came time for the bottom paint. A lovely shade of green!
 |
| the wedding hands picture, take 2… |
 |
| zinc paint for the prop |
Then some paint for the prop, new bootstripe paint and it’s ready to splash!
Another project checked off the list
2/18/12 +A new shelf in the bottom of the pots and pans locker!
A persistant leak in the deck fill for the water tank eventually rotted out the wood shelf in the pot/pan locker. When we bought the boat, we were frustrated by the constant moisture so started searching for the source. Turns out the fill hose had simply slipped off the deck fill. And the deck fill fitting needed to be rebedded. Once we found and fixed the leaks, it was time to replace the shelf. A little help, a little hammer, a little chisel, and, voila – the old shelf was out and it was time to figure out the new one.
 |
| Kathy vacuuming to get all the rotten wood out |
As the old saying goes, “at some point in the life of every project, it’s necessary to shoot the engineers and start the project.” Once started, it was actually pretty straightforward to come up with something we think will meet our needs.
Cutting and making the new shelf in pieces, then test-fitting everything, priming and painting.
 |
| New boards cut and painted |
Of course, getting everything installed upside down while laying on the counter – lots of fun!!
 |
| Greg installing the new boards |
 |
| And we have a new shelf!! |
But now the locker is ready to go and another project is checked off the list.
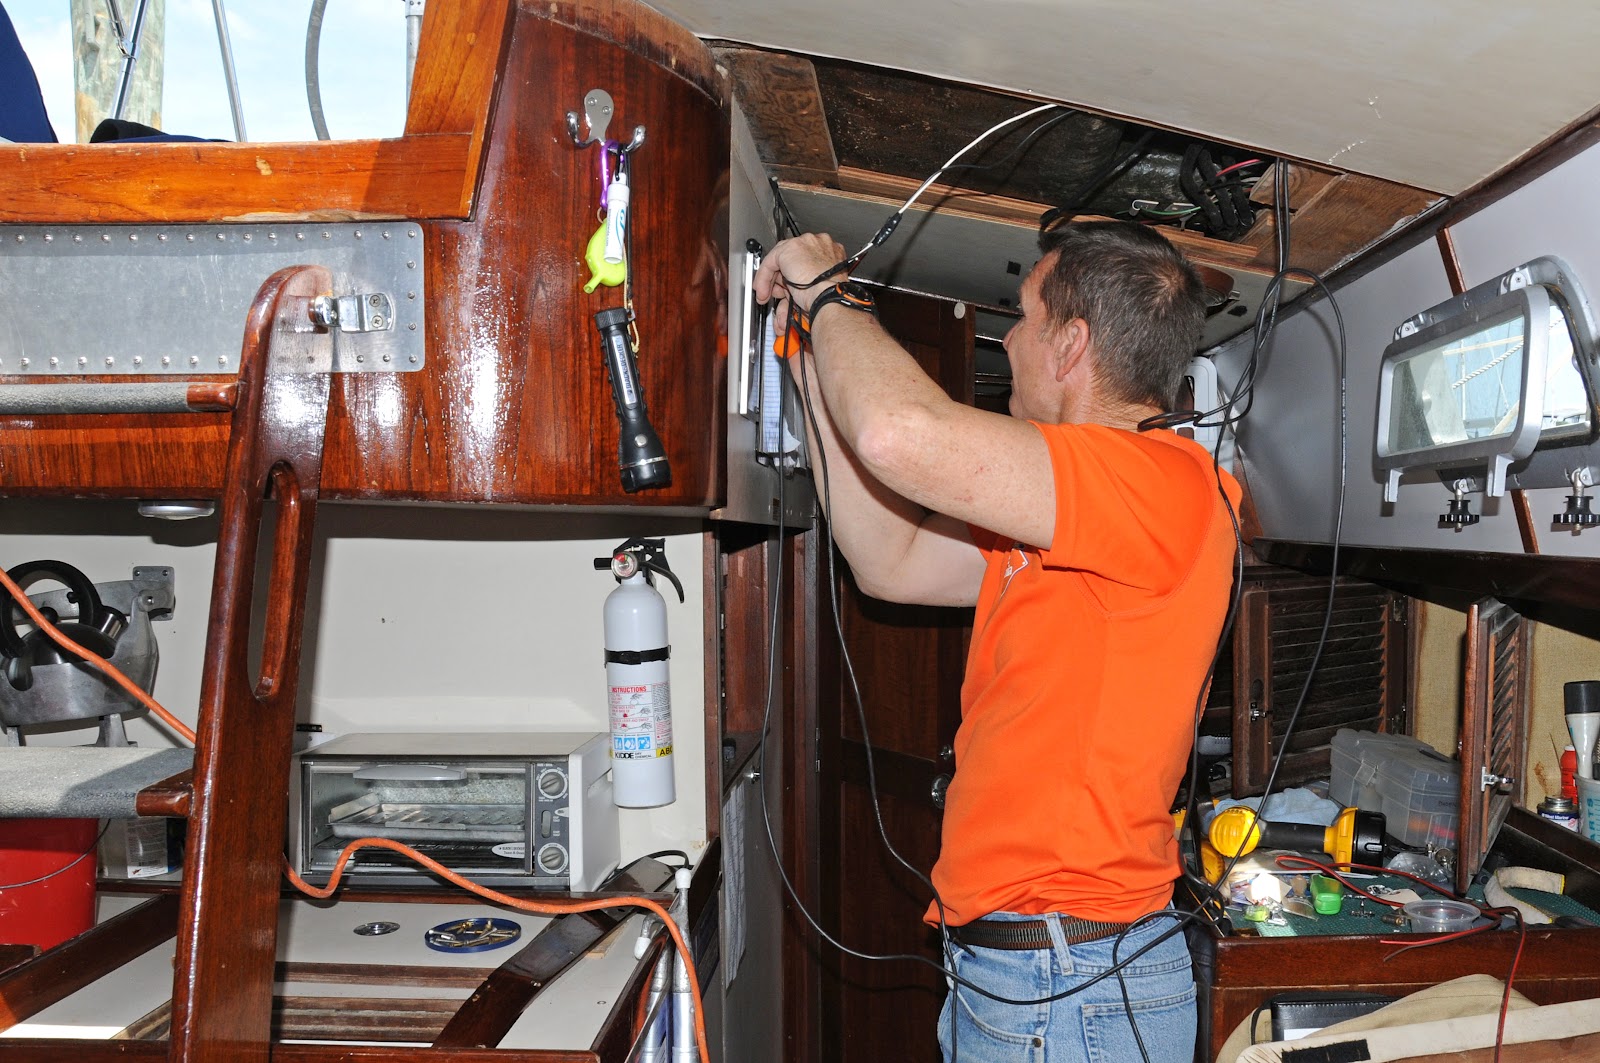
2/12/12 We’ve never had decent electrical capacity on a boat. So we were really excited to be able to do simple things like reading at night, not using flashlights to find our way around the boat and so on. Of course, a couple things stood in the way. Namely designing the new system and then building it.

After a ton of research and a couple phone consultations with experienced electricians, we ended up with a schematic and a wiring diagram.


With the design done, all that was left to do was build it out. Who knew the design part was the easiest phase??
Several weekends of tearing out old stuff, figuring out where to run things, and installing the new bits and pieces and, voila! We have lights, shore power and even 110v without shore-power.

And best of all, we can monitor and keep track of how much we’ve used and how much is left.
Most people take all that stuff for granted. But they haven’t had to start from scratch!
At least the aft head is. It’s amazing how stiff that 1-1/2″ sanitation hose is! Especially when it’s 40 deg outside. Only through generous application of a heat gun and a little persuasion with a

Will it fit?
sawz-all did all those stupid hoses make those bends and fit into those little spaces.
At one point during the process, we needed a little more room for the hoses to wiggle. So out came a 1/2″ piece of wood and fiberglass separating 2 hoses. Almost immediately the 2 hoses expanded to fit the new space. Crud! No help there.
Phil really didn’t help much when, after 4 hrs of pulling, cutting, moving, thinking, debating and changing our minds, he asked “how many connections/hour are we averaging?” 🙁

Yes it finally fit!
But at the end of the day, it was all done. The aft head now has a locking Y valve, 2 ways to empty the holding tank and is fully legal and ready to go for next year.
One winter project checked off the list!
